How to Make Sublimation Brighter in 12 Easy Ways
Sublimation printing is the perfect technique to affix images and artwork onto fabric and other substrates. Apparel decoration businesses prefer it because the design penetrates into the fabric and becomes a part of the garment itself. Plus, the results are outstanding. The sublimation printing process is straightforward, with a lean learning curve- you can start sublimating at home. Being a crafter, you would want your sublimation crafts to be eye-catching and color-rich. However, getting vibrant and accurate prints for every sublimation blank could be challenging for beginners.
The designs would come out dull sometimes, even if you follow the technique precisely. If you want to know how to make sublimation brighter, continue reading the article. We will highlight the factors that affect the quality, vibrancy, and color accuracy of the designs and share a few tips that could help make the colors of your sublimation images pop better.
12 Ways of Making Brighter Sublimation Images
Making radiant sublimation images will be smooth and hassle-free if you follow these incredibly helpful tips and tricks.
Use Sublimation Coating Spray
Use a sublimation coating spray if you are sublimating on t-shirts or other fabric-based substrates. The sublimation coating spray helps sublimation ink bond well with the threads of the fabric. However, you wouldn’t need the spray when using 100% polyester fabric. It is only essential when using a material that sublimation dyes do not adhere to, like cotton.
Sublimation Paper Weight
Expert sublimation crafters recommend using sublimation paper of 120 grams. If you have been using 125g sublimation paper and are not happy with how your sublimation prints are turning out, try switching to a sublimation paper of 120g weight.
Clean the Print Head
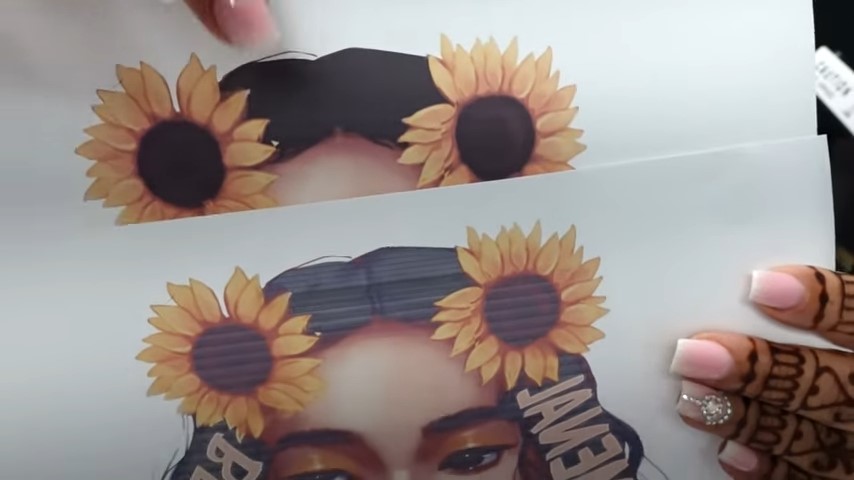
The ink settles when you don’t use your printer regularly. It may cause numerous print quality problems like ghosting, banding, incorrect colors, or transfer lines. Make sure to clean the print head multiple times and print a test page before printing the actual sublimation image. Run print head cleaning and nozzle check only after trying all other options, but print quality is still not up to the mark. Here’s a picture that shows the difference in the print quality before and after print head cleaning.
Pre-Press the Substrate
The moisture in the fabric does not let the ink bond well with the fiber. Heat-pressing the cloth before transferring the sublimation image onto it helps improve the quality and vibrancy of your prints.
Use Polyester or Poly-Coated Materials
100% polyester fabric is best for sublimation projects. Your sublimation designs will look bright and vivid if you opt for polyester fabric or other materials with a polyester coating. The quality of the substrate is a decisive factor in the vibrancy of your prints, so make sure you use a high-quality substrate suitable for sublimation transfer.
Use High-Quality Image
The photos for sublimation transfer should be high-resolution. A high-quality image is essential for high-quality sublimation crafting. Select the print resolution accurately. Set the print resolution at minimum of 300 dpi for sublimation images to be colorful and vibrant. Also, PNG and SVG are the best file formats for sublimation designs.
Use a Protective Layer
Before you transfer your design onto the fabric, remember to place a sheet of paper inside the shirt to prevent the ink from bleeding to the other side. Also, place another paper sheet on top of your sublimation printed design before heat pressing it.
Choose the Right Background
Light-colored backgrounds are more suitable for sublimation images and patterns. A lighter background shifts the emphasis on the design and makes the colors look more powerful and brighter. So we recommend printing your sublimation images on a light background.
Use the CMY Color Combination
The three colors (cyan, magenta, and yellow) known as the CMY combination significantly help create high-quality, vivid images. If you do not include these colors in your designs, your sublimation prints will look dull and faded. Use the CMY combination to make your designs more eye-catching and colorful.
Use Heat-Resistant Tape
You may face the issue of ghosting or image gassing if you do not tightly secure your design over your sublimation blank. The transfer paper can move while you apply pressure to it, so don’t forget to use heat-resistant tape to hold it precisely where you want your design.
Be Careful of the Time, Temperature, and Pressure
The timing, temperature, and pressure you apply decide the quality of your sublimation prints. The pressure should be accurate for your specific substrate; do not over or under-press it. Also, the heat pressing time and settings should be suitable for the sublimation material. These considerations are critical to ensure the quality of your sublimation results. For fragile substrates, like ceramic mugs, plates, etc., the pressure should be low to prevent them from breaking.
Adjust Your Print Settings
You need to adjust a few print settings before printing your sublimation image. Always select high print quality and color. If you are printing with Design Space, validate the bleed option is off. Mirror your design, and adjust the brightness levels of your printer and display before printing the design on sublimation paper. You would also want to uncheck the high-speed printing feature.
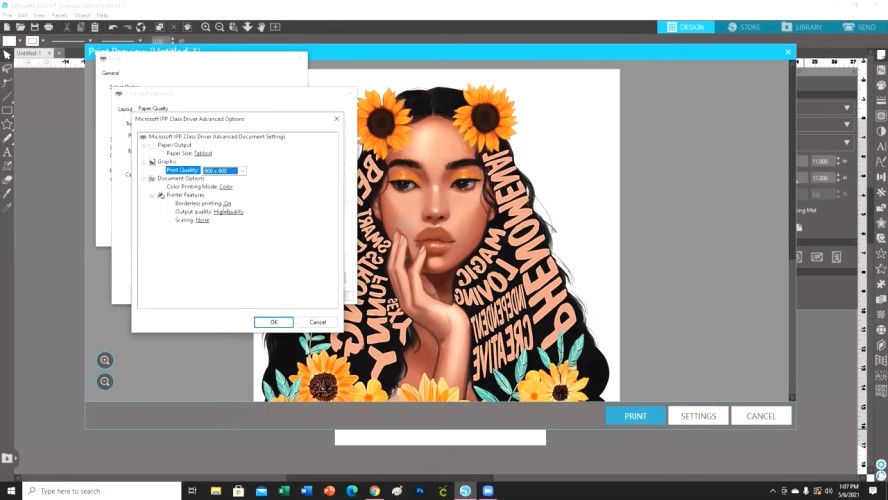
These easy-to-follow tips will definitely improve your sublimation prints. Complete the checklist and choose good quality sublimation paper, inks, printer, and heat press. Always ensure your images are dry before you press them onto your substrates.
Why are my Sublimation Prints Dull?
Several factors affect the quality and vividness of your sublimation prints. For instance, it is critical to understand time, pressure, and temperature settings to get sublimation right each time, no matter which material you choose. You must also have quality equipment and supplies and know how to adjust the color progression of your designs. Are you using a suitable sublimation printer? Do you have the right paper and inks for sublimation?
A seemingly minor error could make a world of difference to your prints. Let’s discuss all the elements in detail to help you elevate your game at printing sublimation images. Please note that the design looks dull on sublimation paper; it will brighten once you apply heat and pressure to transfer it to the substrate.
Color Management and ICC Profiles
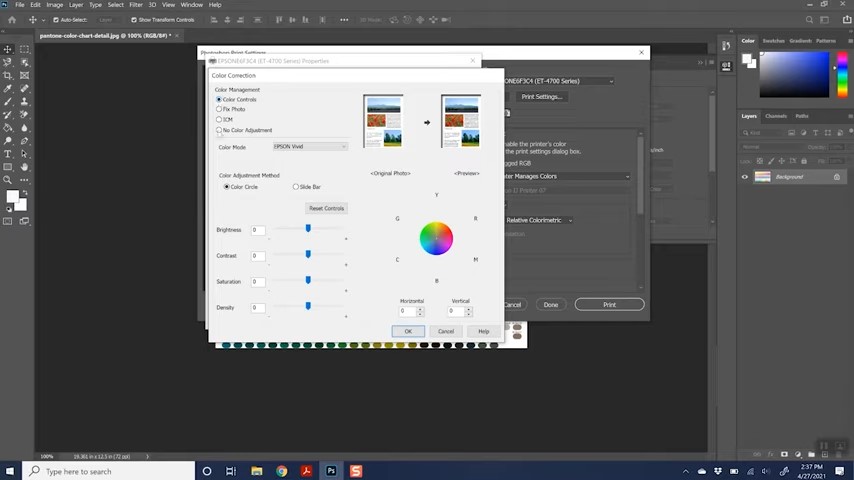
Your display shows colors in the RGB mode while your printer uses the CMYK mode, so there will be a difference in colors in what you see on your screen and what the printer will reproduce. Therefore, color management for your particular printer is crucial. You have to adjust the colors of your design according to your printer and modify the brightness levels. Experiment with color combinations and adjust the brightness and contrast in your design until you get the best results possible.
Many advanced inkjet printers have ICC profiles already installed in the printer drivers that help them manage colors accurately. You can also download it on your computer and use it for color correction via Photoshop or Coral.
You Need the Right Sublimation Printer
Choose a suitable sublimation printer if you want professional-quality designs. You would also need to keep the printing operational regularly. Infrequent printer usage makes the ink dry and causes blockage in the print head. It affects the print quality considerably. Dedicated sublimation printers are expensive, but there are quality inkjet printers that you can convert for sublimation. If all the above troubleshooting tips do not work, you can try switching to a newer, better printer.
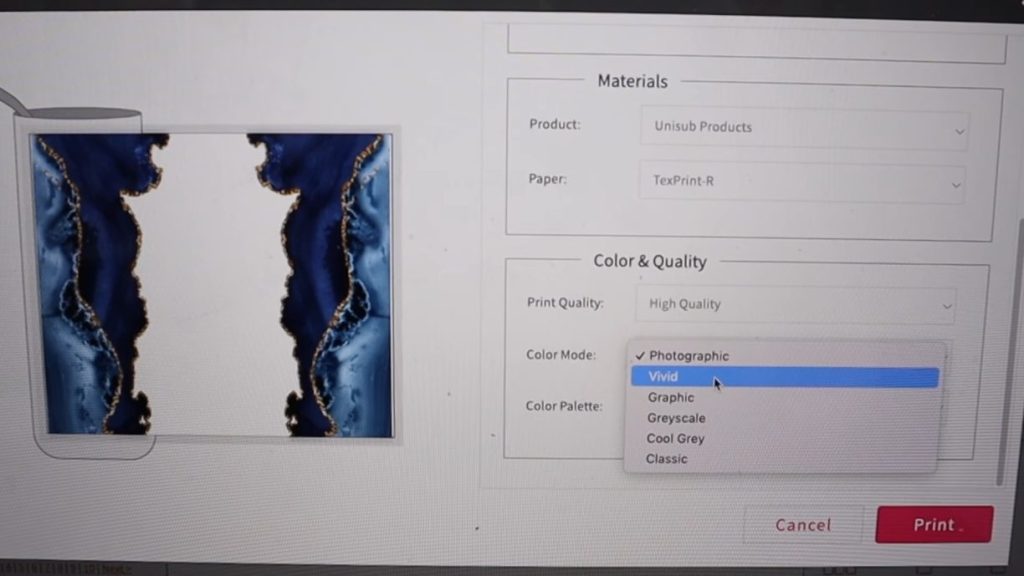
A printer with refillable ink cartridges or ink tanks can be an excellent choice. Whichever printer you get, clean it regularly to maintain print quality. An important thing to note is that you need to select vivid from the print quality options on your device for brighter sublimation images.
Temperature and Pressure Settings
Selecting the appropriate heat and pressure setting is really important- both over and under-heating can ruin the design. You will get orange and yellow patches on your print, and will also end up damaging the substrate if the heat setting is too high. Heat settings vary for different substrate materials.
You should be aware of the recommended heat and pressure settings for the sublimation blank you intend to use. For instance, 380F for 45 seconds is the right temperature and time for polyester fabric. The pressure should be medium. Similarly, for ceramic mugs, the appropriate temperature is 370-400 F, and you need to apply medium pressure for 150-200 seconds.
You can get suitable temperature and pressure settings for your sublimation blank from the manufacturer. Also, try experimenting with the temperature and pressure for different substrate types to figure out the best setting and save it for your sublimation projects later.
Sublimation Paper Quality
The quality of the sublimation paper should be good for bright, vivid images. Also, make sure to print on the poly-coated side of the sheet. People often make the mistake of printing on the wrong side, which makes the prints dull and faded. Sublimation paper usually indicates which side you can print on, so look for the instructions on the package. Don’t forget to check that paper is compatible with your printer and inks.
Sublimation Ink Quality
The sublimation inks have a significant influence on your design print quality and brightness. You can not compromise on the ink if you want the output quality to be top-notch. Another critical element is the ink cartridge levels. If your ink cartridge levels are low, the print will not be as vibrant and detailed as it would be with full ink cartridges. Also, running out of ink during the print process can damage your print head, which sabotages your printer’s functioning. So keep the ink levels full when printing sublimation designs.
Conclusion
Sublimation printing is an art that requires thorough attention and skill. Besides getting the right equipment and supplies, acquiring the necessary skillset is also crucial. Let go of the fear of making errors and keep practicing to achieve perfection. Creating sublimation designs and transferring them onto a substrate is simple. But your prints will only grab attention if you learn the art of color correction and use high-resolution images. Also, the pressure and temperature settings are critical in making your prints perfect. With the tips we have shared in this article, you will smoothly make your sublimation prints brighter and more vivid.

I am Mason, a Team Leader & Writer, a proactive and collaborative individual who works closely with my team to achieve shared goals. I am skilled in managing projects and am able to lead my team to success by setting clear expectations, providing guidance and feedback, and fostering a positive and productive work environment. I have a deep understanding of printers, sticker printers, label makers, sublimation, and craft markets, and use my knowledge to produce high-quality content that is both informative and trusted for the readers.


